How to Create a Cinematic Frame: A Simple Guide for Filmmakers
You don't need an expensive camera to create a cinematic image.
You need to understand why you are placing the camera where you are placing it.
The same character, in the same location, can feel powerful, lonely, dangerous, romantic or vulnerable depending on the composition, angle, movement, lighting, lens and colour.
That's what cinematography is about.
Here’s a simple breakdown.

1. Start With Composition
Before you press record, ask:
What do I want the audience to look at?
Composition is about deciding what to include and exclude from your frame.
A good frame can:
Direct attention
Create context
Establish relationships
Create visual meaning
Rule of Thirds
Place important elements along the grid lines or intersections.
It usually creates a more balanced and visually interesting frame.
Shot Size
Choose the distance based on the emotion you want.
Extreme Wide Shot — location and scale
Wide Shot — subject + environment
Medium Shot — interaction and body language
Close-Up — emotion and detail
Extreme Close-Up — very specific details
Don't choose a shot size just because it looks cinematic.
Choose it because the story needs it.
2. Use Camera Angles Intentionally
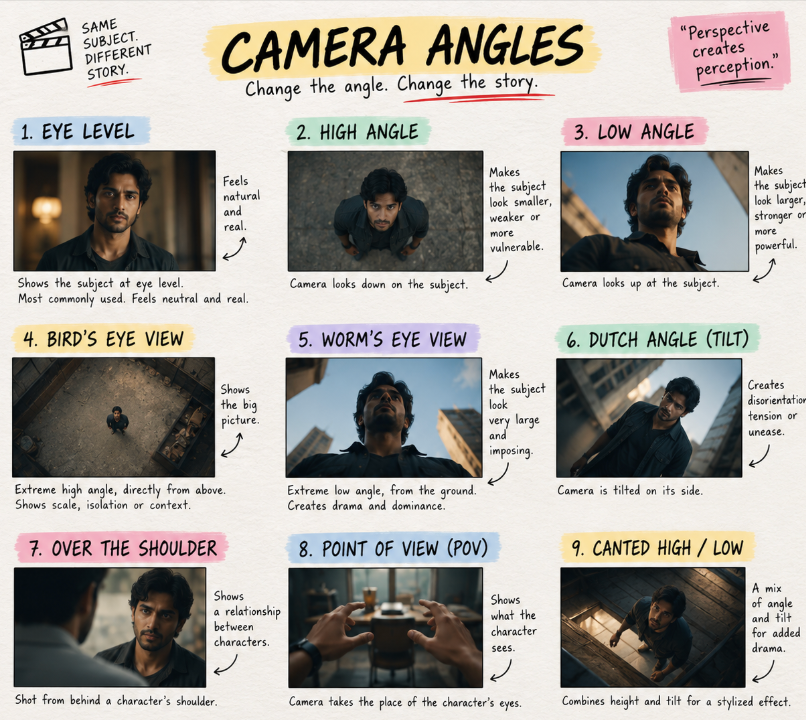
The camera's height changes how the audience perceives a character.
Eye Level
Natural, neutral and realistic.
High Angle
Makes the subject appear smaller, weaker or vulnerable.
Low Angle
Makes the subject appear larger, stronger or more powerful.
Bird's Eye View
An extreme high angle that shows scale, isolation or the bigger picture.
Worm's Eye View
An extreme low angle that creates drama and dominance.
Dutch Angle
Tilting the camera creates unease, tension or disorientation.
Over the Shoulder
Useful for showing relationships between characters.
Point of View
The camera becomes the character's eyes.
The lesson:
Angles don't just show what something looks like. They show how it feels.
3. Move the Camera With Purpose
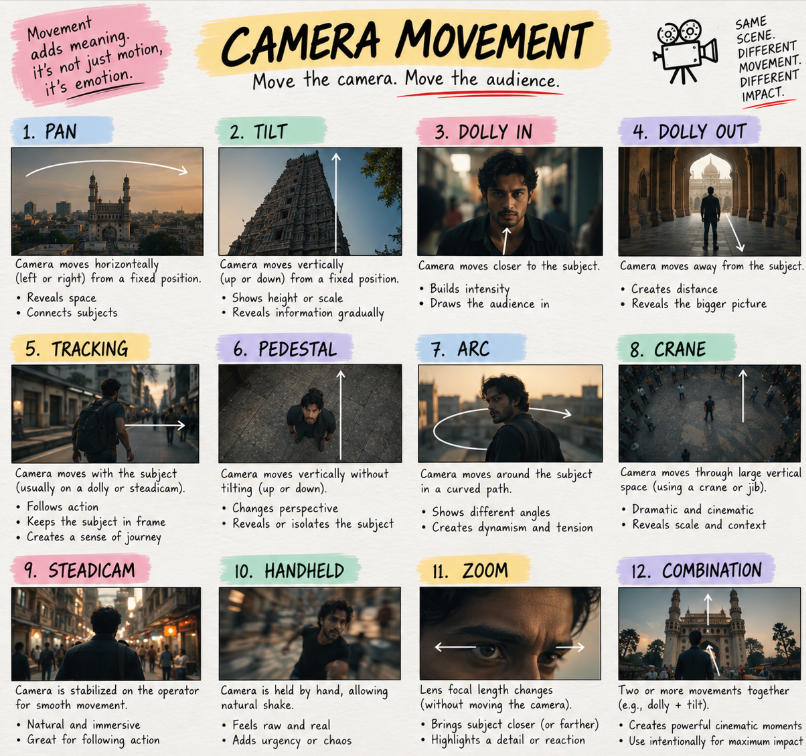
Camera movement should have a reason.
Pan
Moves horizontally.
Useful for revealing space or connecting subjects.
Tilt
Moves vertically.
Can reveal height, scale or information.
Dolly In
Moves closer to the subject.
Can build intimacy or intensity.
Dolly Out
Moves away.
Can create distance or reveal the bigger picture.
Tracking
Moves with the subject.
Creates a sense of journey and keeps the subject in frame.
Pedestal
Moves the camera vertically without tilting.
Arc
Moves around the subject.
Can reveal different perspectives or create dynamic energy.
Crane
Moves through large vertical spaces.
Useful for scale and cinematic reveals.
Steadicam
Smooth, stabilised movement that feels natural and immersive.
Handheld
Introduces natural shake and can feel raw, real or chaotic.
Zoom
Changes focal length without moving the camera.
Can bring attention to a detail or reaction.
Combination
You can combine movements—for example, a dolly with a tilt.
But remember:
Don't move the camera because you can. Move it because the story needs it.
4. Lighting Turns a Location Into Emotion
Lighting doesn't just help us see.
It tells us how to feel.
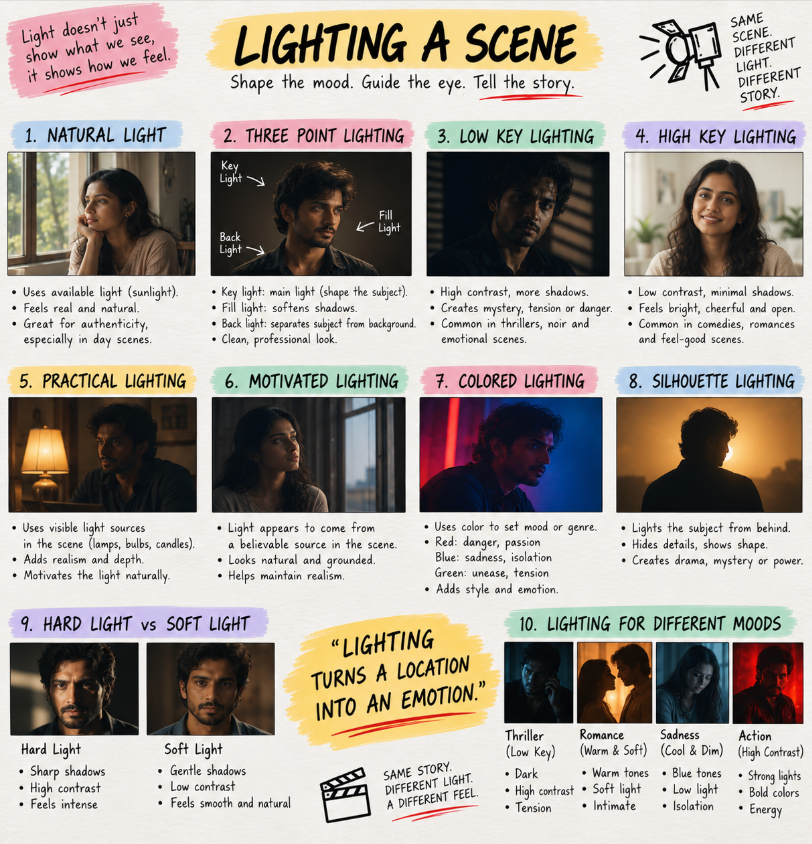
Natural Light
Uses available sunlight.
It often feels authentic and natural.
Three-Point Lighting
The classic setup:
Key Light — main source
Fill Light — softens shadows
Back Light — separates the subject from the background
Low-Key Lighting
High contrast and deep shadows.
Useful for:
Thrillers
Crime
Mystery
Tension
High-Key Lighting
Bright, soft and low contrast.
Often works well for:
Comedy
Romance
Feel-good scenes
Practical Lighting
Uses visible sources inside the scene—lamps, candles, bulbs, etc.
It adds realism and depth.
Motivated Lighting
The light appears to come from a believable source within the scene.
This helps maintain a grounded visual style.
Coloured Lighting
Colour can establish mood, genre and emotion.
Silhouette
Light the character from behind and hide details.
It can create:
Mystery
Drama
Power
Suspense
And don't forget the difference between:
Hard Light → sharp shadows, high contrast, intensity
Soft Light → gentle shadows, lower contrast, natural feeling
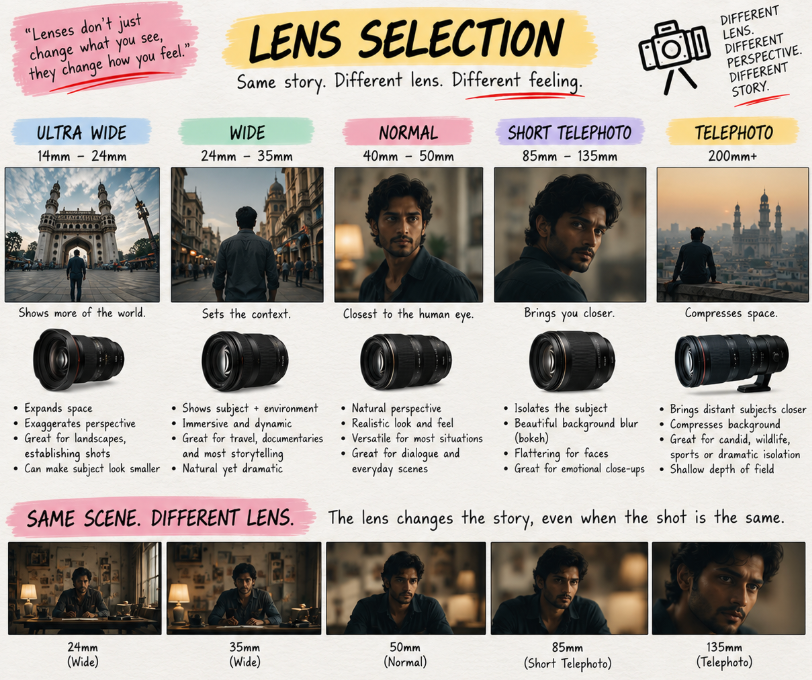
5. Choose the Right Lens
Here's something many beginners overlook:
The lens changes how the audience experiences the scene.
Ultra Wide — 14–24mm
Shows more of the world.
Useful for:
Landscapes
Establishing shots
Large spaces
It can exaggerate perspective.
Wide — 24–35mm
Shows the subject and environment together.
Great for immersive storytelling.
Normal — 40–50mm
Closest to a natural human perspective.
Versatile for:
Dialogue
Everyday scenes
Natural-looking shots
Short Telephoto — 85–135mm
Brings you closer.
Useful for:
Close-ups
Emotional scenes
Isolating characters
Background blur
Telephoto — 200mm+
Compresses space and brings distant subjects closer.
Useful for:
Wildlife
Sports
Isolation
Dramatic compression
So don't ask:
“Which lens looks cinematic?”
Ask:
“What should the audience feel in this moment?”
Then choose the lens.
6. Colour Is a Silent Storyteller
Colour isn't just about making your film look beautiful.
It can communicate emotion.
Warm Colours
Reds, oranges and yellows can suggest:
Warmth, passion, comfort, intimacy or intensity.
Cool Colours
Blues, greens and teals can suggest:
Calm, sadness, isolation or mystery.
Contrast
Contrasting colours can create visual interest and highlight conflict.
Colour Psychology
Different colours can suggest different ideas:
Red — passion, danger, power
Yellow — hope, optimism, madness
Blue — sadness, trust, loneliness
Green — growth, envy, unease
Purple — royalty, mystery, spirituality
Orange — energy, creativity, change
Black — power, death, unknown
White — purity, emptiness, new beginnings
These aren't strict rules.
What matters is consistency and intention.
A consistent colour palette can establish the world, while changing colours can help communicate a character's transformation.
7. Finally, Build the Cinematic Frame
Now bring everything together.
Before shooting, ask yourself:
1. Who or what is the subject?
Know what the frame is actually about.
2. What is the intention?
What emotion should the audience feel?
3. How should I compose it?
Use:
Rule of thirds
Leading lines
Framing
Symmetry or asymmetry
Negative space
4. Can I add depth?
Use foreground, middle ground and background.
Depth makes the frame feel more immersive.
5. What angle should I use?
Eye level? High? Low? Tilted?
Choose what serves the emotion.
6. How should I light it?
Natural or artificial?
Bright or dark?
Soft or hard?
7. What colour and tone does the scene need?
Warm? Cool? Desaturated? High contrast?
8. What details are telling the story?
Props, costume, texture and environment can reveal character without dialogue.
9. Experiment
Try different framings.
Compare them.
Find what works best.
A great frame often comes after experimentation.
10. Bring everything together
The final frame should feel intentional.
Story + Composition + Camera + Lens + Lighting + Colour + Details = Cinematic Frame
The Real Secret
A cinematic frame isn't created simply by buying a cinema camera or putting a shallow depth of field behind your subject.
It comes from intention.
The camera position has a reason.
The lens has a reason.
The lighting has a reason.
The colour has a reason.
The composition has a reason.
And every element is helping tell the story.
So the next time you're shooting a scene, don't just ask:
“Does this look cinematic?”
Ask:
“What is this frame making the audience feel?”
Because filmmaking isn't about making pretty pictures.
It's about using pictures to tell a story.
Same subject. Different framing. Different emotion. Different story.
To help you further and get better at the craft, we have created a filmmaker tool kit, if you like the above content then, you will definitely love our toolkit,
We created a filmmaker toolkit, which helps you in your filmmaking journey!
Get this now: https://superprofile.bio/vp/GHHQql4H